Friday, December 11, 2009

ZZZZZZZAAAPPPP!!!!!

Yup, my first time getting zapped. Luckily, it was very mild. I've been working on my Silvertone 1484 head. I had drained the caps, but disconnected the drain resistor and the main filter caps had built back up a little charge...which I found when I was probing around the choke to make some changes to the standby switch. Little tiny spark and a very small jolt....but it was still memorable in that it scared me. I suspect if it was the old original Atomics in there I would have been OK, but they where brand new eletrolytics I'd gotten from Weber, so they where fresh and eager to do their job. Trying to remember to keep the drain resistor hooked up when working on my amps now....

So, yeah....I'd put together a project list at Mouser for the 1484 head (number 1) that consisted of every resistor and capacitor. It would've come to a bit over $100 if I'd pulled that trigger. One day I was looking at Weber's site....and saw they carried resistors and capacitors. Hmm...so I put together an order for everything and it came to less than $40! Trigger pulled!

The parts came in over last weekend, so this week I've been digging in the Silvertone. Let me tell you. working on a point to point terminal strip amp is a major bitch. I was trying to properly desolder and remove all the components I wanted to replace, but there are times I just had to cut leads and find a way to make a good connection on the terminal strip. I also ended up needing to splice wires a number of times to extend them, versus completely replacing the wire. Not pretty, not the absolute best lead dress, but it worked.

I'm not done with the 1484 yet, but making good progress. All the electrolytics are new. New power cord, ground switch dissabled. Some of the crappy ceramic disc caps swapped for polyesters. Slowly going through and checking resistors. Best part is, I test my work from time to time and it's all good thus far. I still have some caps I want to replace, and a lot of resistors to check, but it's sounding great and the reverb and tremolo are working...as well as can be expected anyway.

One major thing I did was to change the standby switch to a Fender style. The original was just strange in that it shorted the phase inverter together. I moved it to right before the choke, much like most Fender amps. Much better, IMHO. Screwed up initially though...I disconnected the wires from the standby switch and, without thinking, spliced them together before moving on to changing the switch over. I had done this along with a number of other things, and when I fired the amp up it wasn't working properly.....very, very low output, almost none at all. Uh-oh...

I checked everything over twice and checked all solder joints...and couldn't figure out what was going on. It sounded familiar, just like it did before the standby switch change when the amp was on standby, actually. I remembered this and did some googling....and realized I should have just removed the old standby switch wires, not splice them together...because in doing so I hard wired the damn amp into permanent standby! Ha! It was late....give me a break.

Anyway, I've created a album with some photos....and here's a link showing my revised schematic...changes noted in red, components R&R'd or revised (thus far) highlighted in yellow..I will update this as I do more. Tremolo circuit next!

From Silvertone 1484 #1

Wednesday, December 2, 2009

A lucky Bassman Ten owner!

It's been a long road, but I think I've just about finished working on my Bassman Ten. It's been a real learning experience!

I noticed, over the last couple months, it just wasn't as loud as it should be, or as I remembered it when I first got it. So last weekend I decided to try to figure out the overall health and finish up any maintenance it needed.

I started by pulling the chassis and taking voltage readings everywhere. I had located a recently redrawn schematic where you could clearly read all component values and voltage levels. Everything was within the Fender specified +/- 20%.

So I hooked up my Weber Biasrite to check the bias voltage and current and was very surprised to find .6mA on one powertube and 12mA on the other. It should be closer to 30 to 40 mA! It didn't seem loud because it was only making around 7 watts from 2 6L6 tubes!

Turns out the screen grid resistors had gone open. Some idiot had used 1/4 watt resistors in place of 1 watt resistors and the heat had caused them to go open! That idiot was me, apparently, but I honestly don't remember doing it and don't know why I did! I was very lucky they didn't short. It might have fried my brand new Weber output transformer I think, or at least the new JJ tubes in there.

So I replaced those (with 2 watt metal films), a few other resistors and finished swapping out all the electrolytics. I kept stock values on everything except the cathode bias bypass capacitor which sets the bias level of the second half of both preamp tubes. It was 5µF stock and I upped it to 22µF (62 volts).

I finally removed the death cap and put in a new power cord too. Someone had installed a grounded cord a long time ago, but never disabled the ground switch and removed the death cap. That's all done now. If there's anything left to do, it's swap out all the old diodes. I'm gonna ask around and find out opinions on that. They're around 30 years old now and I wonder about them holding up.

I should also check every carbon comp resistor I've got left to see if they've drifted too far, but I'm in no huge hurry for this because it sounds great, the voltages look good and I have no excess hum or noise. All the critical ones in the power section are new metal films, as well as a few others here and there.

This is really a very cool amp. It's pretty unique among Fenders. Channel two is voiced very close to a AB165 Bassman, Channel one seems to be pretty unique voicing (much darker than two) and the overall topology is close to a Bandmaster without Vibrato. Basically, it lacks the third 12AX7 gain recovery stage of a Bassman (and many others) before going into the 12AT7 phase inverter. Take the vibrato circuit (and tube) out of a Bandmaster and you have the same overall thing.

It's not a loud amp, especially given the two 6L6 tubes, and with the bias being fixed kind of cold, it's only pushing about 32 watts right now. The tubes should last a good long time. I may, at some point, convert it to adjustable bias and work those tubes a little harder, but I'm in no hurry. I think it makes a great rock amp as is...jumper the channels and you get rich distortion at reasonable volume levels. It's kind of difficult to describe the sound, but if you read up on the Bassman Ten around the net, you'll see most agree it sounds great and absolutely unique among Fender amps.

I'll eventually flesh out my blogger photo folder for it, but for now here's one overall shot (notice it's a head now, not the typical 4X10 combo), and a link to my photobucket account for it...

From Bassman Ten


I'm going to try to recount a list of everything I've done to this pawnshop prize here...

All electrolytics replaced
power cord replaced/ground switch dissabled
new tubes and bias balance set
all new screen grid resistors and power rail dropping resistors
new speaker output jack
new output transformer with only 8 ohm tap used
new head cab
negative feedback resistor upped to 1.2k (I think, it was upped anyway)
all mods from previous owners reversed or eliminated

There are a few I may have missed and a few more (like diodes and maybe adjustable negative feedback) that I may yet do.

All in all...very cool project!

Thursday, October 15, 2009

Adventures in amp land

So it's been amp fest for me this week. Two and a half nights of playing my fingers off and annoying the neighbors.

I started out with the Peavey Triumph 60 and 1975 Fender Bassman Ten, one stacked on the other and both running hooked into my Marshall 4X10 (1965B).

That Triumph doesn't have what I'd call Fender cleans, but it's still pretty damn nice. Being able to switch between three channels is awfully fucking cool. Loves pedals, the crunch channel is quite versatile and dialable and the ultra channel is more gain than I typically use...which is great fun. Really glad I have this to fool around with, especially at the price I got it for.

The Bassman is simply not as loud as it should be. Given it has 2 6L6 tubes. I got to looking into that here at work and at home and figured out the replacement transformer is a 4ohm tap (only). So, all this time it's been running as a (more or less) 20 watt amp. No wonder! I don't have a cab wired for 4 ohms at the moment, and am thinking of getting a new Weber output tranformer for it. They're around $60 and would have 4 and 8 ohm taps (and maybe a 16 too).

My Cool Cat Drive came in and I've been messing with it the last two nights. It's pretty damn noisy with the Bassman, but quiet with everything else.(head scratcher) Regardless, I like it a lot and it's interesting to turn the gain all the way down, the volume all the way up and use it as a clean boost. I have a Transparent Overdrive (first gen.) on the way and am really looking forward to A/B them in that mode. Lots of gain on tap too if you push up the "Drive".

Then, last night I dug out my spare Silvertone 1484 head. It worked last time I played it a few months ago, but didn't seem loud enough then and I was nervous about a number of things. I've since found out the output transformer has a second tap at 8ohms that can be hooked up. I did that, replaced the kinda broken speaker jack and then put a better three prong power cord on it. It's as loud as it should be since the output and speaker cab impedances match up now.

I'd seen that Weber sells a replacement output transformer for these too and it's not very expensive, so I figured I might as well have some fun playing it till I get a chance to clean and do some recap work on it. If I blow something, it won't be a huge deal to fix it.

It was really acting up last night though and was making lots of scary noises...so I figured I'd fucked up somewhere or age and dirt finally got the best of it. In an attempt to start trouble shooting, I grabbed a chopstick and began whacking tubes to see what would happen. Damn...V1, the first gain stage 12AX7, made a shit ton of noise when I tapped it. It'd gone microphonic in a big way. No idea what kind of tube it is, can't see any markings, but all the others are original Silvertone tubes. I yanked it out and stuck a ElectroHarmonix in there I had laying around. Ding,ding,ding! No more noise at all!

God I love these (Twin Twelve) amps. I really like having a spare at home I can test pedals and guitars with. It's not exactly like my gigging amp, in part because I'm running it through the Celestion G10L-35 speakers instead of the old Jensens, which I think are much less efficient. I can hear the lack of speaker breakup at home. I also figured out my Vox footswitch will work with the Silvertone to turn the tremelo and reverb on and off. The reverb doesn't function on either one at the moment, but the trem does and sounds awesome! I'll have to come up with another footswitch I can add to my gigging equipment as I want to have one to use at home too. It's just a standard two button, stereo jack footswitch, lots of people make them.

This morning I ran my `74 Champ for a bit. It was acting up last week and I hadn't looked into why yet. It was acting up again this morning. Volume drops, sputtering, noise....I thought I'd try a new preamp tube since it still has the original. That didn't do anything....but while I was testing it, I heard some louder pops and cracks and noticed some faint wiffs of smoke coming from the input jacks! Holy SHIT!

I shut it down and pulled the chassis and took a look around. They place I bought it from had done some maintenance on it and in replacing the volume pot had done a shitty job soldering the lead to the input pin on V1. It looks like it's been variously shorting out and grounding out. I'll fix that next week and see if it corrects the problem. It had been working (and sounding) like a charm before this so I hope it's not too drastic. While in there I noticed it could use a retensioning of the tube sockets as well...

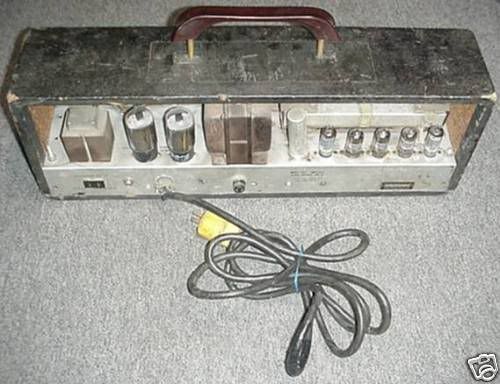
Here's a shot of the back of the Silvertone from the auction listing:

Monday, October 12, 2009

That's more like it.

I think it was three weeks ago now that I finished the `66 Corvette, but it may have just been two. I took a couple days to sand and polish the finish out. I started with 800 wet/dry and progressed through 1000, 1200, 1500 and finally 2000. I like using mineral spirits for the lubricant instead of water. Then I used my buffer with Maquires #1 & #2 polish it to a final shine. I'm very pleased with how this one came out, it has a great shine, the finish is quite thin and I have no sand throughs or significant flaws.

The pots and switch are new (CTS and Switchcraft), it's fitted with a treble bleed circuit and a TV Jones Powertron Plus. I kept the old guard and Grover tuners, but cut a new nut from bone. The bridge, of course, is the replacement Gotoh. It intonates perfectly, the frets feel great, and all in all it plays like a dream. Probably the best of all three of my `vettes.

About the only thing I may change is the pickup. I'm starting to really like the stock Gretsch Hi-Sens Filtertron in my Astro Jet. Much more so than the Powertrons in my other `vettes and the Powertron Plus in this one. The Filtertron doesn't have nearly as much of a humbucker character as these Powertrons do, and I find I prefer that. There is an edgey rudeness to the stock Filtertron and a lack of mids compared to the Powertrons that sound good in the mix with our band.

I think I'm going to experiment with some different pickups and may be switching all my Gretsches to what I find I like best. That could be a Hi-Sens Filtertron (essentially the factory stock Gretsch pickup), a Hot Rod Filtertron, a TV Jones Classic or a TV Jones Classic Plus. Those are my options, as I see things right now.

Click on the photo for the gallery of final pictures. No more refinishing projects this year as winter is almost here. I have a number of amp and pedal projects though, so I've got stuff to tinker with.

From 1966 Corvette finished

Tuesday, September 29, 2009

Pretty cool

I went home after work for a couple hours friday and got the Corvette wrapped up so I could bring it with me for the weekend. Of course, I forgot my camera so I have no photos of it! I'm very pleased with the final result. It plays great, sounds great and looks fabulous. Those big old Grover tuners make it a bit neck heavy, but I think I can deal with that fine. The neck feels great, the frets are excellent, the Powertron Plus is pretty hot and I'm getting some interesting harmonics from the trapeze when I want, which is cool. The D slot in the nut needs a bit of tweaking, and I may need to fine tune a couple other things, but not much. I'll try to get some photos in the next week or so and post them here.


So last night I built the footswitch for my $100 Peavey Triumph 60. I cannot remember if I spoke of it here, but I picked up just the chassis on ebay for $103 shipped on one of those, put a bid in and figure you won't win deals. I won though. No tubes, no footswitch, no reverb tank, no cabinet. Guy said he thought it worked, but thought it might also have a problem. I threw some old tubes in it (2 X 6L6GC, 1 X 12AT7, 4 X 12AX7) that I had laying around and I knew to be good. Hooked up my Marshall 1965A cab and gave it a whirl (after a cursory visual inspection, of course).

From Peavey Triumph 60 amp


No footswitch meant it was stuck on the highest gain channel (Peavey calls it Ultra), but it worked fine with no pops, hums or issues at all. I sourced a schematic from the Peavey forum and, lucky for me, it included the schematic for the footswitch. I drew up my own annotated version and started gathering parts. I found a old three button footswitch on ebay that was ending soon and snagged that for $19.95 shipping inclusive and waited for it to get there.

From Peavey Triumph 60 amp


It arrived friday and I set to work. In gutting it, I was able to salvage the three SPDT (single pole double throw) switches, two of which I needed. The rest had to be bought and built up. Upon first completion, nothing was working right, so I took it back apart and realized I'd wired the diodes backwards! Short lead negative! Short lead negative! Short lead negative, dammit! Oh well, it only took about two minutes to fix that and then everything worked like a charm! I have around $45 in the footswitch. Apparently Peavey will build them for you at $75 plus shipping, so I did OK.

Pretty cool amp with lots of gain on tap. I need to mess with it for a while to find what sort of tones are available. I've wanted one of the older three channel Peavey's for a while and am thrilled to have found one on the cheap.

From Peavey Triumph 60 amp


While I was getting the various bits I stopped at a electronics parts store near me and really had a find! The guy turns up old tubes now and then and often prices them very well. I need to snap some pictures, but I got four mid 60's vintage American made Tung Sol 12AX7s new in the box (and even in the dislplay box!). $19.95 a piece! From what I can tell these usually fetch $80 per tube and up, so I got a helluva deal. I need to try one or two out in V1 of some of my amps see how they sound. Some claim they are the best sounding American made 12AX7, even better than the black plate RCAs that sell for stupid amounts of money.

Wednesday, September 23, 2009

Much better...

Last week I started sanding out the Corvette. I got through 800 and part way into 1000 grit before the weekend. Monday night I finished with the 1000 and did 1200 grit. Last night I used 1500 and then 2000, wiped it down and got the buffer out. It's not quite a mirror shine, but it's closer than I've gotten yet. I think I needed to spend more time with each grit to ensure the previous grit's scratches where completely eliminated. I have some fine swirl marks in the finish still. Overall though, I don't think I have a single sand through, it's smooth and shiny and it looks good.

This morning I installed the pickup, which required some wood removal on the floor of the pickup route. I decided to use the clear pickup ring. I also installed the bridge bushings and was able to route a ground wire from the treble side post to the control cavity. I have a aged bone blank for the nut and will start on that next. I also need to decide if I'm going to go with coil splitting or not. The pickup, a TV Jones Powertron Plus, is wired for it and I think I have a push/pull pot to use. Or I could go with a micro switch and drill a new hole in the non-original guard. Lastly, I dropped the output jack cup in a jar of lacquer thinner in prep for cleaning and installation.

I'll edit and add some photos when our mail is up and running here at work....

From 66 Corvette work

Wednesday, September 9, 2009

Hmm...not my proudest moment.

But I want to share the failures along with the successes. I learn from both, after all.

The Explorer is, essentially, done. When I got home from work tuesday I briefly considered reshooting black then clear on the edges to address the blushing problem. Rather, I commenced sanding and then polishing to see what I had before I started painting yet again. Glad I did, in a way. Once I'd gone through 2000 grit wet/dry using mineral spirits I got the buffer out and brought up some shine.

Oh. Worse than I thought:(

I had blushing EVERYWHERE. On the front, on the back, pretty much all over the place. Ugh. There would be only one way to fix it and that is sand it back down to the amber base color and start all over again with the browns, black and clear.

Bad blushing!

From Explorer Kit


There was a time in my life I was enough of a perfectionist to do just that. Not any more. This guitar is just not that important to me to completely re-do. If it was vintage or particularly sweet in some other way I probably would, but it's a kit I bought on a whim. So...I pushed ahead and got her built.

My form of committing to the ugliness was hammering in the bridge and stop tail bushings. They where a tight fit before paint and are really in there solid after paint. It took a bit of grinding in the pup routes and some finagling to get the Schallers in, and the wiring was a very tight fit, but it all went together eventually. I installed some new CTS 500k solid shaft pots I picked up over the weekend, the Switchcraft switch and jack and the .047µF cap that came with the kit. The stock bridge, stop tail and tuners went on as well. I even re-used the strings I had on it before I started the finishing.

I decided to make a new nut from bone. I had one I'd made for a previous project that didn't go correctly. I'd gotten the string spacing wrong. Luckily it was wide enough and too tall. By sanding down the top, I got it to the right height and eliminated the original string slots. So it only took about 10 minutes to get the nut set up for slotting. I got it right this time.

Once it was all done and strung up I played it for around an hour before I went to bed. I really like these Schallers. They are bright (for humbuckers), articulate and pretty damn hot. They have more of a DiMarzio character than Seymour Duncan character, which is what I prefer in the end. Very nice. They're keepers.

This AM I fixed a little problem with the switch (I had wired it backwards to how I prefer it) and took some pictures in the not very bright light. They pretty much suck, but I will get some better ones on a weekend soon. I played it for a while longer through a different amp and was again impressed. Then I took the strings off and put a third coat of raw linseed oil on the fret board. It's been very thirsty and is darkening up nicely now that it's getting some oil. I like the figuring of the rosewood.

So, it plays quite well and sounds very good (aggressive and very 80's to my ear). The important stuff is right....it's just that it is as ugly as homemade sin. Oh well. I can live with that.

I am replacing the stop tail with a heavier one I have laying around to aid in strap balance. It's better than it was and almost acceptable now, so that might be the last bit that is needed. The back plate is a temp for now. I need to get some thicker, proper, pickguard material to make one from. I also need to decided if I will refret it or not. The frets are level enough for the kind of action I like, and they don't feel too bad, but I'd really like frets of my own choosing in there, especially ones that have not been over beveled, as these are. Last bit I think I will do is get a couple bottles of Grolsch so I can make some home made strap locks for it. (The washers on those flip top bottle caps make good cheapey strap locks).

In thinking about it, I have about $180 in the kit, about $25 in electrical parts and I think I paid about $35 for the pair of Schaller pups on ebay. Add in about three cans of lacquer (estimated total usage) at $8 per can and I have somewhere around...$265 in it total. I think that's pretty good. I have an all mahogany set neck Explorer with quality pups and a nitrocellulose lacquer finish for under $300. Cool.

Here's a link to the album (I'll post an update when I get better photos taken):

Explorer Kit


And a shot of the front:

From Explorer Kit


Lastly...I learned a lot doing this kit. Some of which went into the `66ish Corvette I'm "restoring". It shows too. The `Vette is currently is hanging and curing prior to the process of rubbing out the finish. It looks fabulous and will turn out 100% better than this did. I'm very happy to have made my mistakes on this cool Explorer clone and not on my vintage Gretsch.