Tuesday, March 24, 2009

The Explorer Project

I was reading my favorite guitar forum (Harmony-Central) and a regular there had made a post about a kit he had just received. With it, you could build your own all mahogany set neck Gibson Explorer copy. The photos looked pretty good, and when he mentioned it was about $150, I had to know more.

They come from http://byoguitar.com/ and mine was about $170 total with shipping.

I had built a AXL strat kit before (same thing as a Saga) and wasn't very thrilled with it, though it did turn out OK and was playable. In particular I didn't care for the basswood body that had been absolutely drowned in this thick plastic coating they called "sealer". I was leery of that with the Explorer, but pulled the trigger anyway figuring I'd just strip it first.

I placed the order on tuesday afternoon and, to my surprise, had the kit in hand friday after work! I was also pleasantly surprised by the overall quality. Particularly the sealer coat...they said one thin coat on the webpage and they meant it. It's obviously enough to afford some protection to the wood for shipping and that's it. A plus in my book.

So last night I got started on it. I had tested the neck fit and ntoiced the neck was too big, or the pocket too small (depending how you look at it) for the neck and body to mate. In reality, it's pretty close and overall a good thing. It allows you to use files and sanding blocks to taylor the neck pocket fit precisely, which is what I spent about an hour doing. Then I pushed the neck into place (it was a tight enough fit I could pick the body up by the neck no problem) I checked neck angle and how centered it was with the pup routes.

All that was fine, so I had the bright idea to check the neck pickup...see if it would fit OK. It didn't...or rather barely did. I slid (hammered) the neck up about 1/16th" and all was fine. I put some pencil marks on the body as a visual reference for myself when I glued the neck in.

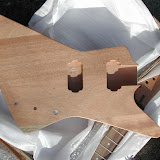
I took the neck back out, cleaned everything, made sure I had all the sealer sanded away on the gluing surfaces and then generously slathered the neck and pocket with Titebond III wood glue. I jammed the neck & body back together, got it lined up and clamped. This caused a lot of the extra Titebond to squeeze out, so I took the clamps back off and cleaned all that up with a damp rag. Titebond III has a 10 minute working time, so all was going to plan. I reclamped everything and then decided I would follow their instructions for structural joints and not bother it for another 24 hours. Pics below and more to come, eventually...

Explorer Kit

Monday, March 23, 2009

Haven't updated in a long time.

Since my last update I finished a second Gretsch Corvette project. Unfortunately, I did not blog about it. But, I'll post a synopsis of my work with some before and after photos here.

Back in the summer of 2008, I noticed a ebay auction for a project Gretsch from a seller I had dealt with before, gravitymusicgear. Great folks to deal with, BTW. I tracked it in my ebay and figured out what I was willing to bid and in the end on May 29th, was the victor! It was pretty much a basket case from the photos...but it was also not quite what they thought it was. They had it listed as a 60's Gretsch Corvette, but evidence indicated it was actually a Gretsch Twist! Total, with shipping, was $308.00. For a one piece 40+ year old Honduran mahogany body and Brazillian rosewood fretboard! Amazing (to me anyway).

When the guitar arrived, I assessed the situation and determined it had indeed been a Twist and was going to be a lot work work to bring back. The serial number on the edge of the headstock did not conform to Gretsches usual practice and placed the guitar as a 1961. It was clearly not your typical 1961 Gretsch Corvette as it had the carved contours. My best guess is it is a very early example of what most people would call a 1962 or 1963 Corvette....perhaps produced as early as late 1961, but who knows.

Here are some pictures from the auction and the small handful of in progress pictures I took. Wish I had taken more, obviously. I'll describe what I found and what I did to get it back into shape.

1962 Gretsch Twist before/during


I was happy to find it was structurally sound when it arrived. A number of holes (something like 13!) had been drilled all over it, some of them inexplicably. I set about plugging everything with some mahogany dowel rod I had acquired and getting the plugs flush with the body. I used Citrus Strip to strip the varnish or shellac it had been coated with and was able to get it down to bare wood without too much trouble. One of the items I was missing was a original trapeze tail piece. Luckily Paul Setzer from the Gretsch pages sold me a spare he had ($45). Parts where acquired, made and fabricated, re-finishing undertaken and by early fall (I cannot remember exactly when, late August/early September) I was finished. I'm very pleased with the outcome. I've gigged the guitar and it performs admirably and elicits comments from the other players in the audience.

Here are some after shots:

1962 Gretsch after


Lastly, the pickup it came with...that thing that looks like a icecream sandwich in the before gallery...I'm not sure what that is. I have yet to install it in something to hear it, but it does register on a ohm meter, so I think it works. I suspect it might be the original Hi-Lo Tron that someone made upper and lower bobbin plates for and then "potted" it in something akin to Millput, or a plumbers type putty. Sometime I want to throw it in a guitar and see what it sounds like. The pickup in the guitar now is a TVJones Powertron. The volume pot is a push/pull affair that allows me to coil split for a single coil tone.